Saturday, March 19, 2016

Our Daily Bread Designs "Keys to Happiness" & Door


Hello everyone!

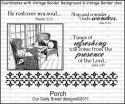
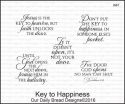
Today I wanted to share another card made using a sentiment from Our Daily Bread Designs "Keys to Happiness" stamp set that was just released March 1st.  The sentiments in this set all have something to do with doors or keys and I wanted to pair one with an ODBD Door stamp. 

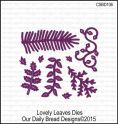
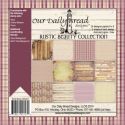
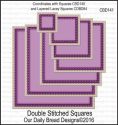
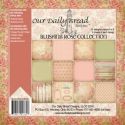
I used ODBD Blushing Rose Collection papers and die cut the little flowers using ODBD Bitty Blossoms dies.  I layered the flowers on a floral vine cut using the ODBD "Foliage & Leaves" die.  The square was cut using ODBD Double Stitched Squares die. 

I colored the door using Spectrum Noir Alcohol Markers (I love how easily they blend), added a few pearls in the flowers, and finished it off with a little satin ribbon. 

Thank you for stopping by!
:)

Here are the products used:


Friday, March 18, 2016

ODBD SLC #272 Scripture & Lace


Hello everyone!

Today's card is for Our Daily Bread Designs Shining The Light Challenge #272 asking 
for "Scripture & Lace."  Here is a link to the challenge:

I decided on a sentiment from Our Daily Bread Designs Porch Stamp Set and the lace was created using ODBD Beautiful Borders. The background paper is from ODBD Blushing Rose Collection and there is even a little lace printed on this paper (however it got a little covered when I decided I wanted flowers, leaves and more.) 

The flowers and leaves were cut using ODBD Bitty Blossoms Die (I love this set) and I used the ODBD Foliage & Leaves Die for the fancy leaf vine.  The flowers and leaves were cut from ODBD Blushing Rose Collection paper.  The flower vine was cut on white card stock and colored a pale green with Spectrum Noir LG1. 

When I think of lace I always think pearls, so I added a couple of little pearls in the flower centers and a couple of heart shaped buttons just for fun. 

I wanted really simple circles for the sentiment so I used the ODBD Circles Die and also used one that is just a touch bigger from the ODBD Circle Ornament Die set.  I set the circles on some dimensional adhesive tape to offset the height created by the flowers (so that it will go through the mail a little easier, I hope.) 


Here are some Our Daily Bread Designs product links:


Thank you for stopping by!
:)
Melissa

Thursday, March 17, 2016

Our Daily Bread Designs "Quilts"


Hello everyone!

Today's card was made using Our Daily Bread Designs "Quilts" stamp set. 

After stamping and heat embossing the quilt image with Extra Fine Embossing Powder (Clear), I colored the image using Spectrum Noir.  I then used Our Daily Bread Designs Double Stitched Squares to cut out the image and several layers so that I could set them one inside another. 

I also used Bazzill's Diamond Paper, Gold Brads, and a little Grosgrain ribbon.  The sentiment (also from the "ODBD Quilts") is popped on a little dimensional adhesive. 

Thank you for stopping by!
:)
Melissa


Happy Anniversary Our Daily Bread Designs & Healing Prayers Stamp Set

Happy Anniversary Our Daily Bread Designs!
Today's cards have been made using new items released for Our Daily Bread Designs' anniversary celebration:  "Healing Prayers" stamp set,  "Lavish Layers" and "Filigree Frames" die sets.


For the card above I used one of the sentiments from "Healing Prayers" and the following ODBD dies: Lavish Layers, Double Stitched Rectangles, Double Stitched Circles, and Bitty Blossoms.  The papers are from the ODBD Easter Card Collection and the ODBD Pastel Paper Pack.

Blog Hop Prize Information
Eight randomly selected winners will each receive a $25 gift certificate to the ODBD Store just for commenting on the Design Team cards! You have until March 19th, 2016 at 9:00 p.m EDT to leave your comments on the Designers Blogs for a chance to win!  The Winners will be posted on the ODBD Blog on March 24th, so be sure to check  back there to see if you won! 

Here is the link to the ODBD Blog:
Our Daily Bread Designs Blog

Here are the links to the Design Team Blogs:
Julie
Sandee
Cathy
Dawn
Lori
Robin
Angie
Chris
Melissa (Guest Designer--You are here!)


For this second card, I used another sentiment from ODBD "Healing Prayers", the new ODBD "Filigree Frames" die set, and the ODBD "Vintage Flourish Pattern" die for the background. After die cutting the sentiment frame and the background, I left the paper in the die and then stenciled a little pink ink over the cut-out areas.  The Filigree Frame is set on dimensional adhesive and then I added ribbon to finish it off.  The blue papers are from the new ODBD Boho Bolds Paper Pad.

                       
Thank you for stopping by!
:)
Melissa


Tuesday, March 15, 2016

Our Daily Bread Designs Soulful Stitches Collection


Happy Tuesday everyone!

Today's card was created using the Our Daily Bread Designs "Soulful Stitches Collection" paper pack. This paper pack is full of soft colors and pretty images. 

I selected one of the papers that had this rocking chair on it, die cut it out using the ODBD Circles, then layered it up with more circles die cut with the ODBD Double Stitched Circles.  I then used the ODBD Double Stitched Rectangles for the base and added a sentiment from the ODBD Thank You Sentiments stamp set.  I also used some dimensional adhesive under the circles and the sentiment.  

You can barely see it, but I added a border along the bottom using a ODBD Beautiful Borders die.  
 I cut it from the same paper as the background because I just wanted a little extra detail, but it is hard to see in the photo. 

Here are the links to the ODBD products I used:


Thank you for stopping by!
:)
Melissa

Monday, March 7, 2016

Our Daily Bread Designs "Keys to Happiness" Gate Fold Card


Hello everyone!

I just wanted to share this gate-fold style card with you today. I created it using Our Daily Bread Designs "Keys to Happiness" stamp set, the ODBD Bitty Blossoms Dies, ODBD Lovely Leaves Dies, the ODBD Keys dies, and the ODBD Double Stitched Circles.  I used one of my favorite paper packs from Our Daily Bread Designs called "Rustic Beauty Collection."  


Our Daily Bread Designs Keys dies are so detailed and they have a key ring die included, so I just had to try to make a little key ring of these beauties.  I cut them from heavy card stock, inked them up with some bronze and gold, and then heat embossed the front and the back to make them 
shiny and sturdier. 


I placed a blank panel on the inside of the card so there is enough room to write a little note to the recipient of this card. 

Here are the products I used:


Thank you for stopping by!

Melissa